Table of Contents
There is a particular sinking feeling that comes with drilling a gallery wall: you measure, you mark, you drill, you hang — and then you stand back and realise the whole arrangement sits two inches too far to the left. Picture ledge gallery styling removes that moment entirely. Instead of fixing every frame to the wall, you fit one or two narrow ledges, lean your art against the wall on them, and keep the freedom to slide, swap and restyle whenever you like. One row of screws holds the ledge; everything on it stays undecided.

Picture Ledge Gallery Styling: Why Leaning Art Works So Well
A traditional gallery wall is a commitment. Each frame has its own hole, its own hook and its own exact position, so changing one print means filling, sanding and starting again. A ledge turns the wall into a shelf for art. Frames lean at a gentle angle, overlap slightly, and can be rearranged in five minutes on a Sunday morning — a new print for spring, family photos at the front for a birthday, a calmer set of landscapes when you want the room to feel quieter.
That flexibility is also why ledges suit renters, new homeowners and anyone whose taste is still settling. You learn what you actually like by living with it, and a ledge lets you test combinations before committing to anything. It borrows a trick from professional display: in an art gallery, where exhibitions change constantly, work is rarely treated as permanent — and your living room can enjoy the same freedom.
Picture Ledge Gallery Styling: Choosing Ledges, Frames and Art
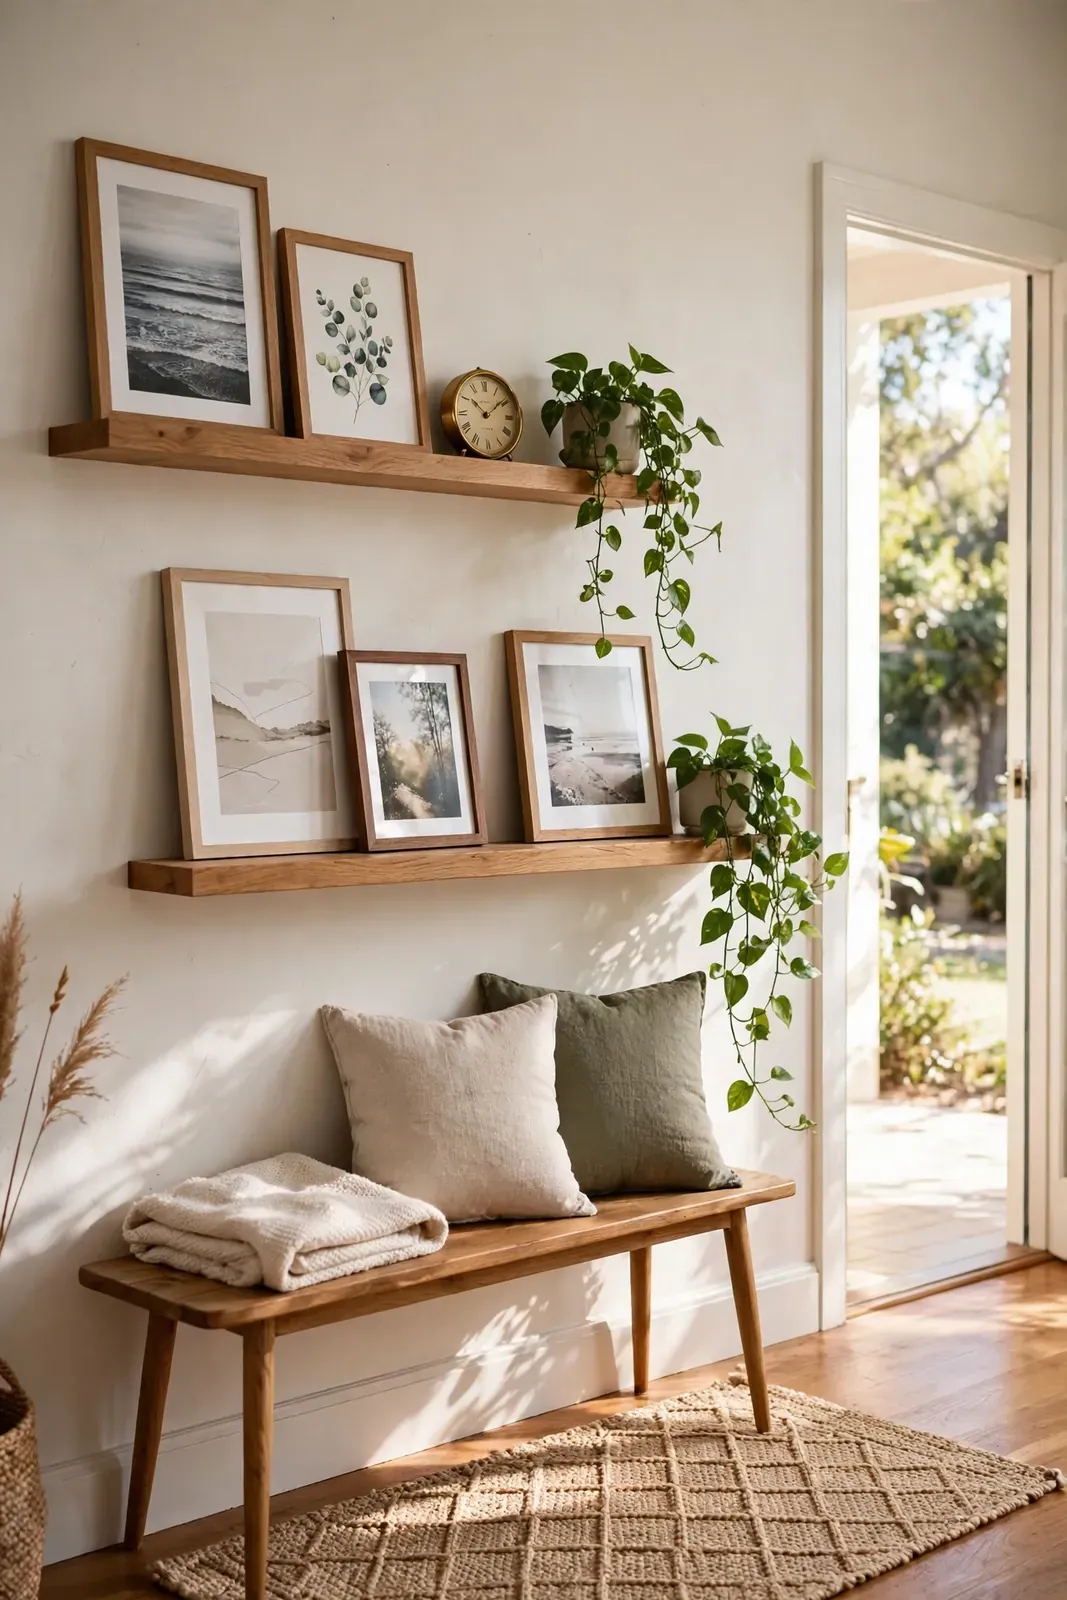
Start with the ledge itself. A proper picture ledge is shallow — around 9 to 11 centimetres deep — with a small raised lip at the front edge that stops frames sliding forward. That lip matters more than the finish. Length depends on your wall: one long ledge of 120 to 180 centimetres gives a calm, continuous line above a sofa, while two shorter ledges are easier to fit, easier to level, and kinder to a small or awkward wall. Wood suits most rooms; white disappears into a pale wall, oak warms it, and black or walnut gives a sharper, more deliberate edge. That is the foundation of good picture ledge gallery styling.
Frames should vary, but within limits. A good picture frame protects the work and sets it apart from the wall, and on a ledge the frames themselves become part of the pattern. Pick two or three finishes — say oak, black and one brass or white — and repeat them across the ledge so the mix looks chosen rather than accidental. Sizes should step up and down: one or two large pieces as anchors, medium frames filling the middle ground, and small prints or postcards tucked at the front.
For the art itself, mix types rather than matching them. A landscape beside a line drawing, a family photograph in front of a larger botanical print, a child’s drawing given a proper frame — the contrast is what makes a ledge feel personal. Keep a loose colour thread — two or three shared tones — running through the selection. Good picture ledge gallery styling is mostly editing: keep what earns its place, and let the rest go.

Picture Ledge Gallery Styling Rules: Layering, Height and Breathing Room
The golden rule of layering is simple: tallest at the back, smallest at the front, and let frames overlap by a few centimetres rather than lining them up edge to edge. Overlap creates depth and hides the plain edges of frames behind. Work in odd numbers where you can — groups of three or five pieces read more naturally than even rows — and leave one or two deliberate gaps. A ledge packed frame-to-frame looks cluttered; a ledge with breathing room looks curated.
Height is the decision people get wrong most often. Above a sofa, fit the ledge so the bottom of the lowest frame sits roughly 15 to 20 centimetres above the sofa back — close enough to belong to the seating, not floating up near the ceiling. On a free wall, a single ledge at about eye level, around 145 centimetres to the centre of the main frames, works well. Two ledges need roughly 35 to 45 centimetres between them so the top row does not crowd the bottom row’s tallest frames. Get the height right and picture ledge gallery styling looks intentional from every seat in the room.
Finally, add one or two non-frame objects and stop there: a small potted plant, a ceramic vase, a tiny clock or a short stack of books lying flat. These break up the row of rectangles and make the ledge feel like part of the room. More than two or three objects, though, and the art gets lost behind the ornaments.

Installing and Styling Your Picture Ledge: Step by Step
Step 1 — Choose the wall and mark the height. Pick a wall you see often — above the sofa, along a hallway, over a console or desk. Mark the ledge height in pencil using the guidance above, and check the line against nearby furniture, not just the ceiling.
Step 2 — Find solid fixing points. Use a stud finder where you can, and proper wall plugs matched to your wall type everywhere else. A loaded ledge carries real weight — several frames, glass included — so fixings are not the place to improvise.
Step 3 — Fit and level the ledge. Drill for the ledge only, screw it firmly, and check it with a spirit level before tightening fully. This is the one row of holes the whole idea needs, so take the extra two minutes to get it dead level; a sloping ledge makes every frame look drunk.
Step 4 — Arrange on the floor first. Lay your frames out on the floor or a table in ledge order: anchors at the back, smaller pieces overlapping at the front, one object at one end. Photograph the arrangement on your phone — it makes rebuilding it on the ledge far easier.
Step 5 — Build the ledge from the back. Place the largest frames first, lean them flat against the wall, then layer forward. Step back after every two or three frames and look from the doorway and from where you actually sit; a ledge is viewed from the room, not from a ladder.
Step 6 — Secure the front pieces. A small blob of removable museum putty behind the bottom corners of front frames stops them creeping or rattling when doors slam — sensible in any home, essential with children or cats. That small step keeps finished picture ledge gallery styling looking neat day to day.

Picture Ledge Gallery Styling on a Budget: Spend on the Ledge, Save on the Art
The ledge and its fixings are where money earns its keep: a solid ledge with a real retaining lip, fixed properly, is the structure everything else depends on. Ready-made ledges in standard lengths are inexpensive; having a carpenter cut one long piece to your exact wall is often barely more, and removes the visible join between two short ledges — a small detail that good interior design, the planning of a room as a whole, always sweats.
Frames and art are where you save. Charity shops and market stalls are full of sound frames that need only a clean and a new print inside. Prints themselves can cost almost nothing: public-domain botanical plates and old maps print beautifully at home or at a copy shop, family photos are free, and a rotating print from a calendar or art book you already own costs nothing at all. Buy one good large anchor print if you love it, and let everything around it be thrifty — the ledge format makes inexpensive art look deliberate. That balance is the quiet secret of affordable picture ledge gallery styling.
Common Picture Ledge Gallery Styling Mistakes to Avoid
The most common mistake is a ledge that is too shallow or has no lip, bought because it was sold as a generic floating shelf. Frames on a flat shelf slide, tilt and eventually fall; a picture ledge’s raised edge exists for a reason. Second is hanging the ledge too high, leaving the art floating in no-man’s-land between furniture and ceiling. Third is matching everything — identical frames, identical sizes, identical spacing — which produces a corridor-in-a-hotel feeling rather than a home. Most picture ledge gallery styling problems are really problems of measuring and restraint.
Fourth, overloading: a ledge has a weight limit and a visual limit, and both matter. If frames hide more than a third of the piece behind them, you have too many. Fifth, forgetting the lean in your measurements — a leaning frame’s top sits lower and further back than a hung one, so check head clearance above sofas and in hallways before you commit to the tallest frames. Finally, never styling it again defeats the point — a ledge is meant to change.
Frequently Asked Questions
Will leaning frames fall off a picture ledge?
Very rarely, if the ledge has a proper front lip and the frames lean at a shallow angle against the wall. The lip catches the bottom edge, and gravity holds the frame against the wall rather than pulling it forward. For front-row frames, a small piece of removable museum putty adds cheap insurance in busy households. That is why picture ledge gallery styling suits busy homes so well.
How many frames fit on one picture ledge?
On a 120-centimetre ledge, plan for three large frames at the back with three or four smaller ones layered in front. Longer ledges scale up, but keep some empty space at one or both ends — a ledge that is about two-thirds full almost always looks better than one filled edge to edge.
Can I use picture ledges in a rented home?
Yes, and they are one of the most renter-friendly displays there is: one ledge needs just two or three screws, compared with a hole per frame for a hung gallery wall. Keep the screws and a small tub of filler for move-out day, and the wall can be made good in minutes. Picture ledge gallery styling gives renters a full gallery look for just a few screws.
What should I put on a picture ledge besides art?
One or two small objects at most: a trailing plant, a ceramic vase, a small clock, or a flat stack of two or three books. Choose things with a different shape from the frames around them, and keep anything heavy or fragile towards the back where it cannot be knocked forward.
How often should I restyle a picture ledge?
Whenever you feel like it — that is the point. Many people make small seasonal changes: lighter prints and photos in spring, warmer tones and candles nearby in autumn. Even swapping the front two frames takes five minutes and makes the whole room feel freshly considered.
A picture ledge asks very little of you — one level row of screws, a handful of frames you probably already own — and gives back a gallery you can change as often as your life changes. Start with one ledge, your largest print at the back and a favourite photo at the front, and enjoy the small pleasure of a wall that never has to stay the same. That is picture ledge gallery styling at its best: settled enough to enjoy, loose enough to change.